
Binary message schemas
Describe a message field by field: name, type, position and size. The schema does the decoding on the way in and the encoding on the way out.
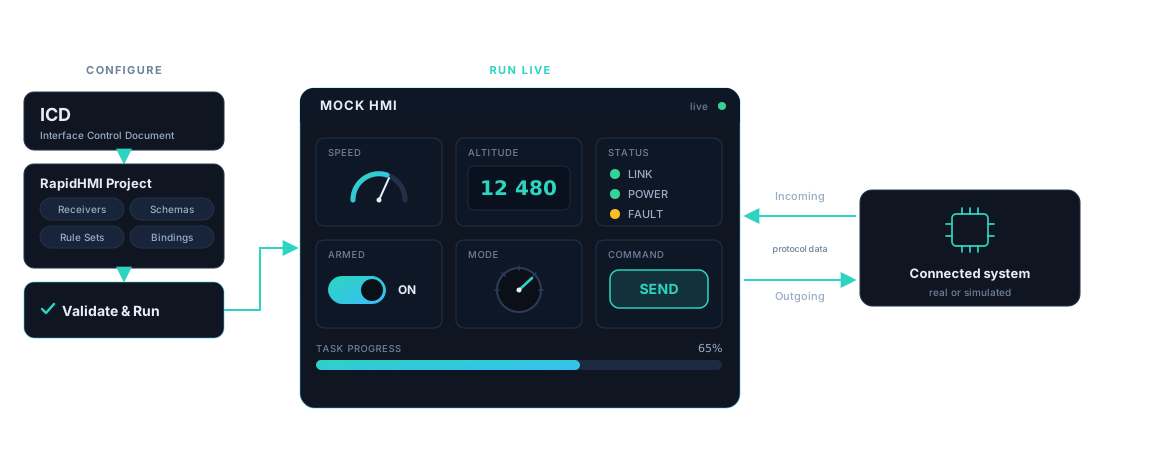
An HMI is the set of controls and readouts people use to operate a system. RapidHMI lets you build one visually, bind its controls to protocol fields, and run it against a real or simulated system. Data arriving updates the interface. Operating a control sends correctly encoded data back.
Not a UI mock-up. A mock interface that speaks your protocol.
Windows desktop application, under active development.
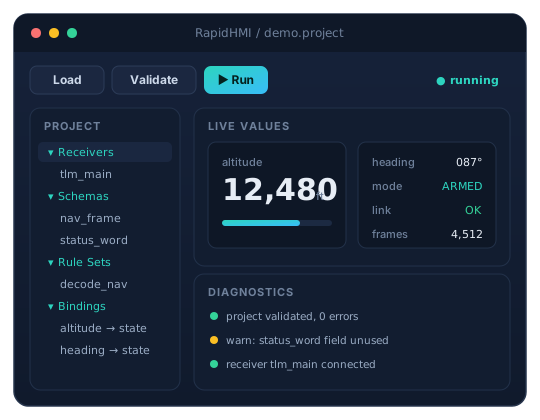
Every project seems to need a small interface: a protocol viewer, a debug panel, a UDP utility, a quick Qt or WinForms app. The interesting part takes an afternoon. The rest is the same plumbing every time.
| Writing another tool | RapidHMI |
|---|---|
| Read the interface definition | Read the interface definition |
| Write parsing and decoding | Define the message schema |
| Write networking code | Configure the connection |
| Build a Python, Qt, WinForms or WPF interface | Design the interface visually |
| Wire decoded values to widgets | Bind controls to fields |
| Write encoding for outgoing messages | Configure what a control sends |
| Compile, debug, repeat | Validate and run |
| Maintain another application | Reuse the project next time |
The first row is deliberately identical. RapidHMI does not replace your understanding of the system. It replaces the code you write around it.
Four steps, all of them visual. No code, no build step.
Describe the binary messages your system exchanges: the fields, their types and where they sit in the data. Then point it at a UDP or TCP connection.
Lay out the interface with the controls you need. Gauges, indicators, switches, dials, buttons and readouts.
Point a control at a field. A gauge reads one value, a switch writes another. This is configuration, not binding code.
Run it against the real system or a simulator. Live data drives the interface, and what you do on screen goes back out.
This is the part that separates RapidHMI from a packet viewer or a screen designer. The mock interface is on the wire, not next to it.
A field moves a gauge. A state bit lights an indicator. A counter fills a readout.
Flip a switch, turn a dial, press a button. The correctly encoded message goes out.
Describe a message field by field: name, type, position and size. The schema does the decoding on the way in and the encoding on the way out.
Gauges, indicators, switches, dials, buttons and numeric readouts that respond to values and produce them.
Broken references, missing fields and configuration mistakes are reported up front instead of turning into runtime puzzles.
Everything is configuration in one project, so you can put it in version control, hand it over, and adapt it for the next interface.
The same problem turns up in defence, aerospace, automotive, mining and industrial automation: long programs, several teams, and interfaces that need exercising before everything is in one room.
RapidHMI is under active development and heading toward a first release. The focus is binary message formats carried over UDP and TCP. CAN fits the same kind of system communication and is a natural step later, but it is not supported today.
Define the data. Build the mock interface. Connect it. Interact with the system.
No public download yet. Get in touch and we will show you where it stands.